Pouring a concrete slab is a fundamental step for creating durable and functional spaces, whether for driveways, patios, or shed foundations. With the right guidance, you can save money and customize your project to suit your needs, achieving professional-grade results.
This guide provides a clear, step-by-step approach to help you get it right. If you’d rather leave it to the experts, our skilled team at Graypaw Concrete Finishing LLC is here to ensure flawless results for your concrete projects.
Preparation To Pour a Concrete Slab
Proper preparation is essential for a successful concrete slab project. By carefully planning and following each step, you’ll create a stable, durable foundation that meets your project’s needs.
Choosing the Right Location
Selecting the ideal location is the first step in ensuring a strong and lasting concrete slab. Choose a level area with adequate drainage and verify that your plans comply with local building codes. Be sure to obtain any necessary permits before beginning.
Measuring and Marking the Area
Accurate measurements and clear markings are critical for a well-executed slab. Measure the dimensions of your project carefully and use stakes and string to outline the area, ensuring precise boundaries for the pour.
Excavation and Leveling
A stable base starts with proper excavation and leveling. Dig to the required depth, remove any debris or loose sandy soil, and compact the surface thoroughly to provide a firm and even foundation for the slab. Add a gravel fill layer to improve drainage and provide additional stability for the slab.
Installing Forms for the Slab
The forms will define the shape and structure of your concrete slab. Use durable materials to build the forms and secure them firmly in place, making sure they are level and stable to prevent shifting during the pour.
If reinforcing with rebar, use wrapping tie wire to secure the bars, ensuring they remain in place throughout the pouring process.
Materials and Tools For a Concrete Slab
List of Required Tools
Having the right tools on hand is crucial for a smooth and efficient concrete slab project. Below is a list of essential items you’ll need to get started:
- Trowels
- Level
- Screed
- Mixer
- Shovel
- Gloves
- Goggles
- Knee pads
- Tall Rubber Boots
Choosing the Right Concrete Mix
Selecting the right concrete mix is critical to ensuring your slab meets the demands of its intended use. For driveways or garages, opt for a stronger mix designed to handle heavy loads, while patios and smaller projects can use a standard mix.
Additionally, consider the size of your slab and choose a mix that provides the appropriate durability and finish for your project.
Pouring the Slab: Step By Step Guide
Step 1: Mix the Concrete
- Combine water and concrete mix until the consistency resembles thick pancake batter.
- For large projects, use a concrete mixer to ensure uniformity. For smaller jobs, mix by hand in a wheelbarrow or bucket.
Step 2: Pour the Concrete
- Start pouring concrete into the forms, beginning at one end and working your way across.
- Spread the mix evenly using a shovel or rake, filling all corners and slab edges.
- Work quickly to prevent the concrete from drying unevenly.
Step 3: Level the Surface
- Use a screed board or a straight piece of lumber to slide across the top of the forms, leveling and removing excess concrete.
- Follow with a bull float, keeping the leading edge slightly elevated to prevent the tool from digging into the wet concrete and creating uneven areas.
- Check for low spots and add more concrete as needed while maintaining an even surface.
Finishing Touches
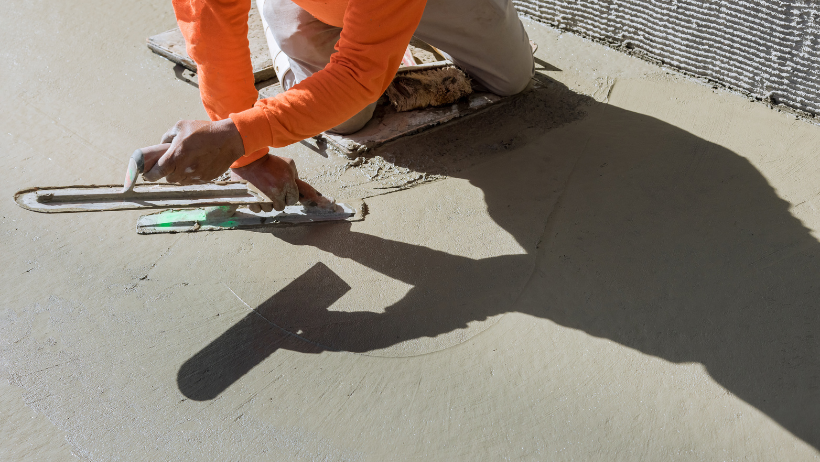
Step 4: Smoothing the Surface with a Trowel
- Use a trowel to create a polished and even finish across the finished slab.
- Work methodically, starting from one end and moving to the other, pressing lightly to smooth out ridges and imperfections.
- Pay special attention to the edges and corners, refining them for a clean and professional look.
Step 5: Adding Texture or Patterns (Optional)
- If desired, apply decorative finishes like a broom texture for slip resistance or use stamping tools for patterns.
- Work quickly while the concrete is still wet, ensuring the texture adheres evenly without disrupting the slab’s integrity.
Curing and Maintenance For Your Concrete Slab
Proper curing and ongoing maintenance are essential for maximizing the strength and durability of your own concrete slab. Taking the time to cure it correctly and maintain it well can help prevent cracks and ensure the slab remains functional for years to come.
Importance of Curing for Durability
Curing is a critical step that allows the concrete to gain its full strength and durability. Rushing this process or skipping it altogether can result in weak spots and cracks, compromising the slab’s integrity over time.
Techniques for Curing
To retain moisture and support proper curing, cover the wet concrete slab with plastic sheeting or damp burlap immediately after finishing. Allow the concrete cure for the recommended duration, adjusting for weather conditions, to achieve the best results.
Tips for Long-Term Maintenance
To keep your concrete slab in excellent condition over the years, regular maintenance is essential. With a few simple practices, you can protect your investment and extend the lifespan of the slab.
- Seal the Surface: Apply a concrete sealant periodically to guard against moisture, stains, and wear.
- Clean Regularly: Sweep away debris and wash the surface to prevent dirt buildup and discoloration.
- Inspect for Cracks: Check for small cracks or damage and address them promptly with a concrete patch to prevent further deterioration.
- Avoid Harsh Chemicals: Use mild cleaners to avoid breaking down the concrete sealant or surface.
- Protect from Heavy Loads: For driveways or garage slabs, distribute the weight of the concrete evenly and avoid concentrated heavy loads.
Common Mistakes to Avoid
Even small missteps can compromise the quality and durability of your concrete slab. Avoid these common mistakes to ensure your project is a success:
- Skipping Proper Preparation: Failing to compact the soil or level the surface can result in an unstable foundation.
- Using the Wrong Tools or Techniques: Improper equipment or methods can lead to uneven surfaces and weak spots.
- Rushing the Curing Process: Not allowing the concrete to cure fully can cause cracks and reduce the slab’s strength.
- Ignoring Weather Conditions: Pouring in extreme heat or cold without proper adjustments can impact the slab’s finish and durability.
- Overlooking Maintenance: Neglecting sealing or repairs can shorten the lifespan of the slab.
Applications of Concrete Slabs
Concrete slabs are versatile and suitable for a variety of practical and aesthetic uses. Here are some common applications:
- Driveways: A durable, low-maintenance option that withstands heavy use and weather exposure.
- Patios: A practical and decorative choice for creating functional outdoor living spaces.
- Shed Foundations: Provides a stable, long-lasting base for sheds and other small structures, ensuring stability and durability.
How Much Does It Cost to Pour a Concrete Slab?
The cost of pouring a concrete slab depends on several factors, including the slab’s size, thickness, and intended use. On average, the cost ranges from $4 to $8 per square foot for basic slabs. Here’s a breakdown of key considerations:
- Materials: Concrete mix, gravel fill, and reinforcing materials like rebar can affect costs.
- Labor: If hiring professionals, labor typically adds to the expense.
- Project Complexity: Decorative finishes, extra thickness, or larger slabs will increase the price.
For an exact estimate, contact our team at Graypaw Concrete Finishing LLC to discuss your specific project needs.
Let Our Team Handle Your Concrete Project
Pouring a concrete slab can be a rewarding DIY project, but achieving professional results requires precision and effort. By following the proper steps, you can create a durable, high-quality surface. However, if you’d rather rely on the experts, our team at Graypaw Concrete Finishing LLC is here to help.
We specialize in flawless concrete finishes tailored to your needs, ensuring your project is completed with care. Visit Graypaw Concrete Finishing LLC to get started.
Related Article: How to Build a Retaining Wall